

Food waste usually doesn’t happen in the bin — it happens in the fridge. A small refrigerator makes it even easier for leftovers to slide behind a carton, produce to wilt unseen, and “I’ll use that tomorrow” to turn into “Why does this smell?”
The fix isn’t buying more containers or doing a once-a-year deep clean. It’s building a simple system that makes food visible, safe, and first in line to be eaten. This fridge organization checklist is designed for small fridges, shared households, tight shelves, and busy weeks — with a clear layout that helps you stop food waste without turning your kitchen into a storage warehouse.
If you only remember one idea, make it this: your fridge should work like a mini grocery store. New items go behind older ones, “use soon” foods get a dedicated zone, and raw items stay contained and low to prevent leaks.
Key Takeaways
- Use a small-fridge layout that prioritizes visibility to prevent “out of sight, out of mind” waste.
- Create a Use-It-First zone so items near expiration stop disappearing into the back.
- Store foods by temperature and safety — and keep raw proteins sealed and low.
- Use stacking + vertical space to make a small fridge feel bigger (without overcrowding).
- Adopt quick daily and weekly habits that keep the system running in under 5 minutes.
1. Why Small Fridge Organization Matters for Reducing Food Waste
Small fridges don’t forgive messy habits. When shelves are shallow and drawers are tight, one awkwardly placed container can block airflow, hide ingredients, and turn your fridge into a game of Tetris — with the loser being your grocery budget.
Food waste isn’t just annoying — it’s expensive. Many families lose a meaningful chunk of their grocery spend to items they bought with good intentions but never used. In most kitchens, the main culprit is simple: people can’t eat what they can’t see.
1.1 The Small-Fridge Problem: Visibility, Not Willpower
Most people don’t “choose” to waste food. It happens when:
- Leftovers get stacked behind taller items and disappear.
- Produce goes into a drawer with no plan and turns into a forgotten science experiment.
- Condiments multiply, take over the door, and crowd out ingredients you actually cook with.
- One “mystery container” creates hesitation… and hesitation becomes waste.
1.2 The Payoff: Less Waste, Faster Meals, Easier Shopping
When your fridge is organized for a small space, you get immediate wins:
- Meal prep speeds up because you aren’t hunting for ingredients.
- Grocery shopping gets cheaper because you stop rebuying what you already have.
- Food lasts longer because it’s stored correctly and rotated consistently.
- Stress drops because there’s a place for everything (and no surprises).
2. Preparing Your Small Fridge for Optimal Organization


Good organization starts with a reset. Don’t skip this step — organizing around expired food and sticky shelves is like making your bed with crumbs in it.
2.1 The 20-Minute Reset (Fast and Realistic)
- Clear one shelf at a time. Put items on the counter grouped by category (dairy together, produce together, leftovers together).
- Toss the obvious. Anything moldy, leaking, or expired goes immediately.
- Wipe as you go. Warm water + mild dish soap works for most messes. Dry shelves before restocking.
- Make space on purpose. In a small fridge, empty space is not “wasted” — it’s airflow and flexibility.
Quick safety note: If you choose to disinfect, follow product directions and never mix bleach with ammonia or vinegar. Always rinse food-contact surfaces if required by the disinfectant label.
2.2 Take Inventory Like a Mini Store
Before you put anything back, do a 60-second inventory:
- Use soon: items within the next 2–3 days (half a jar of sauce, opened deli meat, wilt-prone greens).
- Meal anchors: proteins, a few key vegetables, eggs, yogurt, tortillas, rice — whatever you actually build meals around.
- Backups: extras you don’t need this week (freeze if you can).
2.3 Measure the “Usable” Space (Not the Total Space)
In small fridges, the most usable areas are the front of shelves and the top of drawers — where you can see and reach. Plan your system for what you can access easily, not what you can theoretically cram in.
3. Understanding Refrigerator Temperature Zones

Not every part of the fridge is equally cold. Doors are warmer and fluctuate more. Lower shelves tend to stay colder. Your goal is simple: store food where it stays safest and freshest — and prevent raw items from contaminating ready-to-eat foods.
3.1 Top Shelf: Ready-to-Eat Zone
Use the top shelf for foods you can eat without cooking:
- Leftovers (in shallow containers so they cool and reheat evenly)
- Prepared foods, salads, cooked grains
- Snacks you want to reach for first
3.2 Middle Shelf: Dairy and “Daily Use” Items
The middle shelf is ideal for items you use often and want stable temperatures for:
- Milk, yogurt, cheese
- Eggs (kept in their carton)
- Open jars you rely on during the week (broth, sauces, salsa)
3.3 Bottom Shelf: Raw Proteins (Contained and Low)
Store raw meat, poultry, and seafood on the bottom shelf in a sealed container or leak-proof tray. This is the simplest way to prevent drips onto ready-to-eat foods.
3.4 Crisper Drawers: Produce With a Plan
Drawers work best when they aren’t random. Separate produce when you can:
- Vegetables together (greens, broccoli, peppers)
- Fruits together (berries, apples, citrus)
Tip: Some fruits release ethylene gas that speeds ripening. Keeping sensitive vegetables away from high-ethylene fruits helps reduce surprise spoilage.
3.5 Door Storage: Condiments Only (Mostly)
The door is the warmest and most temperature-unstable area. Keep it for:
- Butter (if you’ll use it quickly)
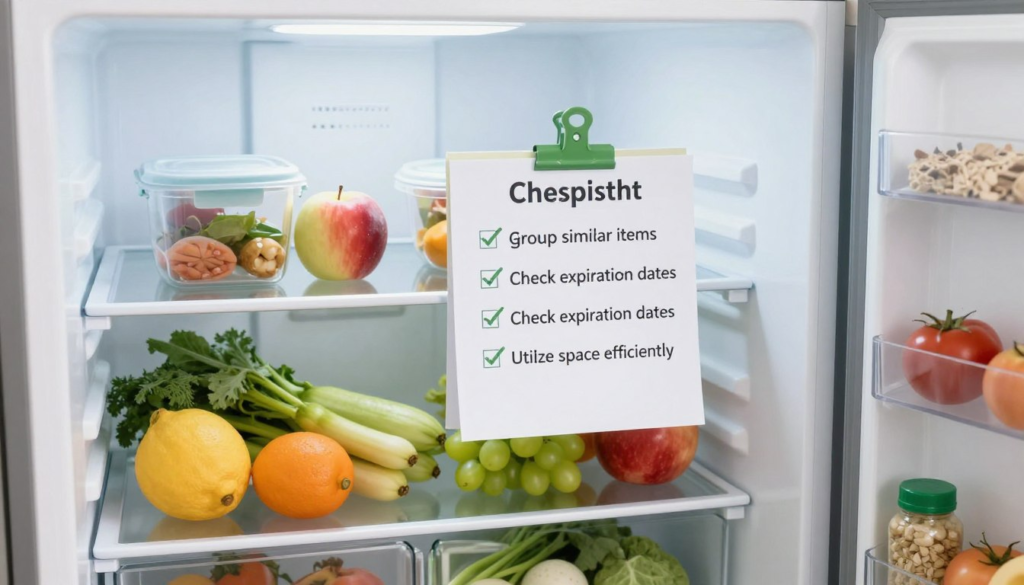
4. Complete Fridge Organization Checklist (Small-Fridge Edition)

This is the core system. If you do nothing else, do this — it’s designed to work even when your fridge is small and your week is busy.
4.1 Set Up a “Use-It-First” Bin (The Anti-Waste Zone)
Pick one small bin or shallow tray and label it USE FIRST. Put it at eye level. This is where food goes when it’s:
-
- Opened and needs finishing (dips, sauces, sour cream)
-
- Near its best-by date
-
- Leftover portions you want to eat for lunch
If you live with other people, this bin becomes the “common language” of the fridge: everyone knows what to reach for first.
4.2 Top Shelf Checklist (Ready-to-Eat)
-
- Put leftovers in clear containers (visibility beats good intentions).
-
- Label with what it is + date (masking tape + marker works).
-
- Keep the front row “grab and go” (lunches, snacks, prepped produce).
4.3 Middle Shelf Checklist (Dairy + Weekly Staples)
-
- Group dairy in one area so it doesn’t get scattered.
-
- Keep eggs in the carton (it protects them and keeps dates visible).
-
- Stand jars upright in a small tray so you can lift one thing, not ten.
4.4 Bottom Shelf Checklist (Raw Proteins)
-
- Use a leak-proof container or tray under raw meat and seafood.
-
- Keep raw proteins to one zone so they’re easy to find (and safer).
-
- Freeze what you won’t cook soon — small fridges punish “maybe later.”
4.5 Crisper Drawer Checklist (Produce That Gets Used)
-
- Don’t bag everything. If you can’t see it, you won’t eat it.
-
- Use paper towel in containers for greens (helps manage excess moisture).
-
- Keep “salad week” produce together so you can build meals quickly.
4.6 Door Checklist (Condiments + Drinks)
-
- Declutter condiments monthly — if it’s been untouched for a year, it’s probably not part of your real cooking life.
-
- Keep the door for stable items (condiments, sparkling water, juice).
-
- Avoid storing highly perishable items in the door if you can help it.
Quick map recap: Ready-to-eat foods up top, daily staples in the middle, raw proteins sealed at the bottom, produce in planned drawers, condiments in the door.
5. Smart Storage Solutions for Small Fridges (Without Overbuying)

You don’t need a full container makeover. In a small fridge, a few high-impact pieces do the job better than a dozen matching bins.
5.1 The “One Tray” Rule for Tiny Shelves
Use one shallow tray (or bin) per category. Examples:
-
- Breakfast tray: yogurt, jam, butter, cream cheese
-
- Cooking tray: open sauces, broth cartons, chopped aromatics
-
- Snack tray: hummus, fruit, grab-and-go items
Why this works: you can pull one tray forward and instantly “shop” what you already own.
5.2 Stackable, Clear Containers (Visibility + Vertical Space)
Clear containers keep leftovers from getting lost. Stackable shapes reduce wasted air gaps. Choose sizes that fit your shelf height so you can stack safely without blocking airflow.
5.3 A Lazy Susan for the “Back Corner of Doom”
If your fridge has a back corner that eats jars, use a small turntable for:
-
- Small condiment jars
-
- Medication that needs refrigeration
-
- Little bottles (lemon juice, flavorings, dressings)
5.4 Shelf Risers (Only If You Have Tall Shelves)
If you have a tall shelf that wastes vertical space, a riser can double the usable surface. If your shelves are already tight, skip it — cramped stacking can create more mess, not less.
5.5 Labels That Actually Get Used
Keep it simple:
-
- Masking tape + marker
-
- Write: Item + date (e.g., “Chili — Mon”)
-
- Place labels on the front, not the lid
6. Food Storage Best Practices to Minimize Waste in a Small Fridge
Organization only works if the food stays good long enough to eat. These habits are the difference between “We’ll use it” and “We forgot it.”
6.1 Use FIFO: First In, First Out
When you unpack groceries, don’t just shove new items anywhere. Do a 10-second rotation:
-
- Older items move forward.
-
- Newer items go behind.
-
- The “use-it-first” bin gets updated immediately.
6.2 Portion Leftovers for Your Real Life
One huge container of leftovers is easy to ignore. Two smaller containers are easy to grab. Portion like you’re packing tomorrow’s lunch — because you probably are.
6.3 Keep Raw Proteins Sealed and Contained
Even if the packaging looks fine, put raw meat or poultry in a secondary container. A small tray or lidded bin prevents leaks and makes your bottom shelf easier to wipe down.
6.4 Manage Ethylene-Sensitive Produce
If produce is spoiling quickly, it’s often a storage mismatch, not “bad luck.” Some fruits release ethylene gas (which speeds ripening). Keeping sensitive vegetables and berries separate from high-ethylene fruits can reduce waste.
6.5 Don’t Overpack: Airflow Keeps Food Safer
Small fridges tempt you to stack and cram. But overcrowding blocks airflow and creates warm spots. Aim for a fridge that’s comfortably filled — not stuffed — so temperatures stay consistent and food lasts longer.
7. Daily and Weekly Maintenance Habits (So It Stays Organized)

The best fridge system is the one you can maintain. Here’s the low-effort rhythm that works for most households.
7.1 The 60-Second Daily Reset
-
- Move anything “use soon” into the Use-It-First bin.
-
- Return strays to their zone (dairy together, produce together).
-
- Wipe a visible spill immediately (future-you will be grateful).
7.2 The 5-Minute Weekly Fridge Audit (Before Shopping)
Do this before you plan meals or place a grocery order:
-
- Check the Use-It-First bin and plan 1–2 meals around it.
-
- Look for produce that needs using (soft berries, greens, herbs).
-
- Scan leftovers and commit: eat, freeze, or toss.
7.3 Monthly Mini-Reset (10 Minutes)
-
- Condiment sweep: remove duplicates and old jars you don’t use.
-
- Quick shelf wipe: front edges and handles (where grime collects).
-
- Check fridge temperature (especially in hot months).
8. Common Small-Fridge Organization Mistakes to Avoid

8.1 Overcrowding “Because It Fits”
If your fridge is packed tight, it can’t cool efficiently. Leave breathing room. If you regularly run out of space, freeze more backups and shop smaller quantities more often.
8.2 Storing Perishables in the Door
The door warms up every time it opens. Keep it mostly for condiments and drinks so your most perishable foods stay in colder, more stable zones.
8.3 Opaque Containers That Create “Mystery Food”
If you can’t identify leftovers in two seconds, you’ll delay eating them — and delayed eating becomes waste. Clear containers and simple labels solve this fast.
8.4 Ignoring the Back of the Fridge
In small fridges, the back is where food goes to be forgotten. Use trays and turntables so you can pull items forward instead of digging for them.
8.5 No “Use-It-First” Plan
If everything is treated equally, nothing gets used in time. The Use-It-First bin is a tiny change that creates a huge shift in how quickly food gets eaten.
9. Conclusion
A small fridge can absolutely be organized — it just needs a system built for real life: clear zones, visible food, and a simple rotation routine. When you set up your shelves like a mini store, your leftovers get eaten, your produce lasts longer, and you stop buying duplicates.
Start today with three moves: (1) create a Use-It-First bin, (2) keep raw proteins sealed on the bottom shelf, and (3) group your weekly staples so you can spot what you have in seconds. Small habits, big savings — and far less waste.
FAQ
What’s the fastest way to start organizing a small fridge?
Do a “one-shelf reset.” Clear one shelf, toss expired items, wipe it, then restock using zones: ready-to-eat foods up top, dairy in the middle, raw proteins sealed on the bottom. Repeat shelf by shelf when you have time.
What is a “Use-It-First” bin and why does it work?
It’s a small, labeled bin at eye level that holds items you need to finish soon (opened jars, leftovers, produce close to turning). It works because it removes decision fatigue — you don’t hunt, you just check the bin.
How do I stop leftovers from going to waste?
Store leftovers in clear, shallow containers, label them with the date, and keep them on the top shelf where they’re visible. Portion big batches into smaller containers so they become “easy lunches,” not “a project.”
Should eggs and milk go in the door?
In most fridges, the door fluctuates more in temperature. For a small fridge, it’s usually better to keep eggs (in the carton) and milk on an interior shelf where temperatures are more stable, and reserve the door for condiments and drinks.
What’s the best way to store produce in a tiny fridge?
Give produce a plan: vegetables together, fruits together, and keep delicate items visible so they’re used first. If your crisper drawers hide things, move “eat this week” produce into clear containers on a shelf and use the drawers for sturdier items.
How do I keep my fridge organized long-term?
Use a 60-second daily reset (update the Use-It-First bin, return items to zones) and a 5-minute weekly audit before shopping. Consistency beats perfection — small routines keep the system from collapsing.